I love fantasy creatures. Centaurs, unicorns, dragons, griffins...you get the idea. I've tried my hand at making some equid-based creatures, using Breyers (We in the hobby call models we use for customizing "bodies." They can be in any shape, from missing limbs to even brand-new models, although those usually give me heartache to mess with) with varied results.
My first two attempts were a pair of winged horses (There was only one Pegasus in mythology, so there is no "correct plural" other than winged horses), one on the old Jumping Horse, and one on the Fighting Stallion. I don't have pictures of Alexandros, but here's Nikolas. I had to rebuild his tail from scratch (a wire mesh cone covered in epoxy) and cover a large hole that had been burned into his forehead by his previous owner - she was going for a unicorn.


Pretty sharp, hey? Too bad about that goofy mane... I've since learned a better technique for manes, and have plans to go back and make it better...probably when I reattach his tail & the hind leg that got broken when Arwen was under the misguided assumption that since he had wings he could fly. Silly kitty. (In her defense, he got knocked off the top shelf of my work desk when she jumped down.)
Speaking of the wings - they're from an action figure called Spawn by McFarlane Toys. The feathers are flexible, but the "body" of the wings is more rigid. Since at the time I was making Niko I didn't have a rotary tool I had to use a serrated knife to remove the "tabs" that fit into the slots in the figure's back. (I still have one of the figures, and have plans to turn him into some kind of a knight. Or possibly use him for another Centaur.) Then I just made a couple big "blobs" of epoxy (I use Apoxie Sculpt, a two-part epoxy) to attach the wings to the body, one wing at a time, and sculpted feathers around the base of the wings once the epoxy set.

I've also done a Centaur, using a Conan the Barbarian figure (He was leaping to attack a giant gorilla-beast - hacking his legs off was a chore and a half) and an Andalusian body. Unfortunately I couldn't get the figure's hips off, so I twisted them to get him into the wire mesh "chest" I'd built, which caused the mesh to bow out, making him look fat, so I added a "ruff" around the chest. Not sure exactly what my reasoning there was. Oh well. I also added flying mane down his back. Yeah..."seemed like a good idea at the time." One other problem was the Conan torso wasn't quite in scale with the horse, so he looks kinda funky.
 | ||||
| Arion was the name of a horse endowed with speech in Greek & Roman mythology |
 | ||
| Cute little guy, huh? |
I was able to borrow my father's Dremel and cut the legs off. I also started working on thinning the mane to a sort of mohawk and carving out the ears. Word of advice - when using a power tool on a plastic horse, do it outside and wear a dust mask! Also be prepared to be absolutely covered in plastic dust! Blech.
 | |
| "Ohhh, I'm melting!" (insert evil laugh here) |
 | |
| "Doc? I can't feel my legs." |
I wasn't sure at first just how I wanted the mane to look. I was leaning towards something light and airy, like seaweed or kelp. My mother suggested using a feather of some kind, and I grabbed a peacock feather I had in a box of small feathers (Did I mention I make dreamcatchers and medicine shields? I have a ton of feathers of all sizes, shapes and colors. But I digress.) It looked cool, but not quite right.
 | ||
| Actually, more "80s punk rock" than "mystical sea horse" |
Then one night I was poking around a website I frequent called Instructables (A fantastic "how-to" site covering everything you can imagine, from building your own bow & arrows to decorating cupcakes.) in the Halloween costume section (That's another interest of mine, which I'll talk about in another post sometime) and came across a link to Dan the Monster Man's site Gourmet Paper Mache. This guy does some amazing stuff in paper mache!
And then it hit me - that's the perfect solution! (Ok, that pun was totally unintended. I promise!) I'll stuff crumpled newspaper into the mesh to give strength to the tail, and then cover the tail in paper mache. I don't remember any rule in the hobby saying "You can ONLY use epoxy for sculpting!" so why not? Dan's specialty is dragons, and after he forms the body parts (Man, I sound morbid tonight!) out of paper mache and attaches them, he covers his sculptures in a cloth mache "skin" - strips of fabric (he prefers old cotton sheets) dipped in white glue.
So that's my current plan. Since I was going to mix up some paste anyway to work on a "rum" bottle for my pirate costume (More on that some other time. I promise!) I'll work on Lethe's tail at the same time. I'm still trying to figure out scales; Dan makes his from folded fabric and glues them on after the fact, but I'm working on a much smaller project. I think I might use very fine netting, possibly tulle or something similar.
Watching some of Dan's time-lapse videos and reading his blogs gave me the perfect solution to the mane problem (Ok, that one deserves seltzer bottles) and also her fins. Right now I have in mind for her mane to look like a spinous dorsal fin, with possibly a soft dorsal behind it (The spinous is the ones with the pricky spines; the soft fin's spines are covered), and the caudal, or tail fin, will resemble that of a veiltail goldfish.
You know...like those gorgeous fish in Walt Disney's Fantasia during the "Nutcracker Suite":
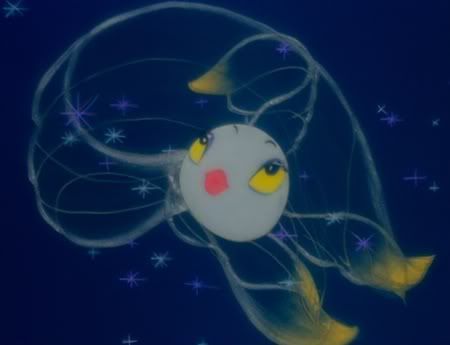
Or, actually, more like this:

Since I want to have her resting on her tail, she'll have a typical "fish tail" but the caudal fin will definitely be flowing. And I have something in mind that I think will work perfectly for that.
As for color scheme, I plan on doing the horse torso in black, a blue-black I've developed for my horses that has a nice sheen to it, and the fish tail will be a dark blue. I have interference powders I'll dust over her when I'm finished - interference blue on the horse torso to bring out the blue sheen, and duo blue/green on the fish tail, which will shimmer green or blue depending on how the light hits it.
I'll post pictures of her as I get each stage done; I hope to have her resting on her tail unsupported, but I might have to install a clear acrylic rod into her stomach that will be secured in her base. I have small shells and bits of coral that my grandmother had collected in Hawaii that will go on the base once I've covered it in sand.
Oh, and her name? Fans of "Buffy: the Vampire Slayer" will recognize it from the memory spell Willow cast on Tara to make her forget their fight (Lethe's bramble) but it comes from Greek legend; Lethe is one of the five rivers of Hades, the River of Forgetfulness. It flows through the cave of Hypnos, the Greek god of sleep, and the murmur of the river brings on drowsiness. It borders Elysium, the final resting place of the virtuous. Lethe means "oblivion" and it was said that those who drank of its waters forgot all their sorrows. Only once the past life has been forgotten can one be reincarnated.
No comments:
Post a Comment